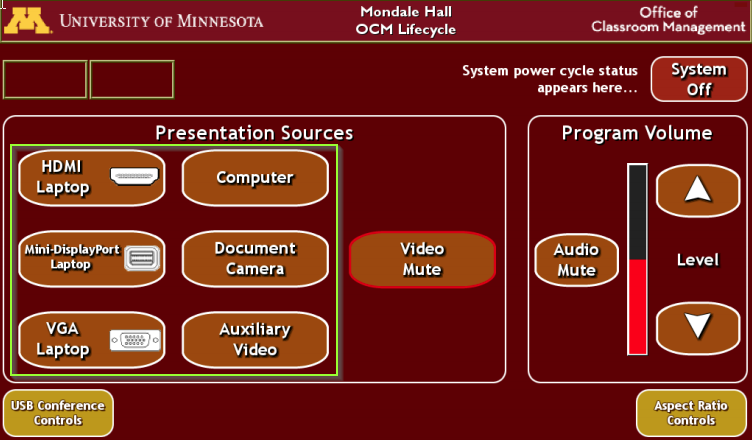
The following applies to projecting images in all general purpose classrooms and may also help with using departmental owned spaces with similar technology.
Connecting your device
- Choose the appropriate cable for your device and connect it. (If you choose VGA, be sure to also connect the audio cable.)
- Press the corresponding Presentation Source button on the touch panel.
- The selected Presentation Source will blink while the system starts up or when the input is switched.

Common troubleshooting tips
If your content does not appear on the projection screen, first confirm the following settings on your device:
Windows
- Press and hold the Windows key, then press the P key.
- Choose the right setting:
- “Duplicate” will mirror what’s on your screen to the projector.
- “Extend” will use the projector as an extended monitor, allowing for unique content.
MacOS
- Open "System Preferences."
- Click on "Displays." (If no image is seen, choosing "Detect Displays” may refresh the choices.)
- To have the same image on both screens, click on the Arrangement tab, then check “Mirror Displays.”
Some software programs, such as PowerPoint, may extend the desktop in presenter mode. You can adjust these settings in the slideshow portion of the PowerPoint menu bar or ribbon.
Network connections
Internet connections are available in all classrooms either via WiFi or the wired network cable.
- The WiFi (wireless network) is available via “Eduroam” and “UofM Guest.” For further troubleshooting, see this resource from the Office of Information Technology.
- The wired network connection requires that you register your computer on the network for DHCP Service (Dynamic Host Configuration Protocol) prior to using the Ethernet connection.
Audio
- Increase the program volume by using the volume up/down buttons on the touchscreen control panel. To maintain a consistent experience, this adjustment will not affect the volume of audio from in-room microphones.
- The "Audio Mute" button on the touchscreen control panel is available next to the volume slider. It will turn green when it is on and show as maroon when it is allowing audio to be heard.
- Be sure to check audio settings on your device.
- The playback might be incorrect, especially when using HDMI.
- The volume of audio coming from your device may be muted.
Request a consultation
We are available for orientation sessions on classroom technology! You bring your device and an idea of how you plan to use the space. We’ll meet you in your classroom to go over how features in that room can help you achieve your goals. To request a consultation, email classrm@umn.edu or call 612-625-1086.